
How to Finish a Potholder Loom
Introduction
Ah, the moment of triumph! There’s something truly satisfying about finishing a potholder loom project. Today, I’m excited to guide you through the process of completing your own potholder, from the final rows to the last embellishments. Let’s dive in and discover the secrets to achieving a polished and professional finish.

Gathering Materials and Tools
- Potholder loom kit or homemade loom: I prefer using a sturdy loom for stability.
- Loopers or loops in desired colors: This is where you can get creative with your design.
- Scissors: A sharp pair is essential for clean cuts.
- Optional: crochet hook or needle for finishing touches: Handy for weaving in loose ends or adding extra details.
Securing the Final Rows
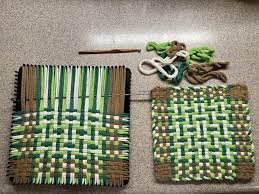
As I approach the end of my potholder project, I focus on weaving the last loops onto the loom. It’s crucial to maintain even tension and check for any missed loops or mistakes along the way. This ensures a neat and tidy finish that’s both durable and visually appealing.
Removing the Potholder from the Loom
With the final rows complete, it’s time to carefully slide the loops off the loom. I proceed with caution, taking care not to unravel the work I’ve put into it. If I notice any loose loops, I make adjustments before moving on to the next step.
Finishing Edges
Now that the potholder is off the loom, I turn my attention to securing the edges. I tie off the corners securely and trim any excess loops or tails for a clean finish. This step is essential for creating a polished edge that enhances the overall look of the potholder.
Optional Embellishments
Feeling creative? Now’s the perfect time to add some personal flair to your potholder. I love experimenting with decorative stitches, contrasting colors, or even personalized initials. These little touches can take your potholder from ordinary to extraordinary.
Blocking and Shaping
For a truly professional finish, I recommend wet-blocking your potholder to achieve a smooth and even surface. After shaping it to your desired dimensions, allow it to dry completely before use. This step ensures that your potholder maintains its shape and durability over time.
Final Inspection
Before declaring my potholder project complete, I take a moment to inspect it closely. I check for any loose threads or uneven edges, making any necessary adjustments or repairs along the way. Once I’m satisfied with the result, I can’t help but admire my handiwork with pride.
Ideas for Using Finished Potholders
Now that your potholder is finished, it’s time to put it to good use! Whether you’re using it as a practical kitchen accessory, gifting it to a loved one, or displaying it as a decorative element in your home, your finished potholder is sure to bring joy and warmth wherever it goes.
Conclusion
As I put the finishing touches on my potholder project, I can’t help but feel a sense of accomplishment. From securing the final rows to adding optional embellishments, each step has been a labor of love. I hope this guide has inspired you to embark on your own potholder loom journey and discover the joy of creating something beautiful with your own two hands.