
Mini Cinnamon Rolls Recipe

Hey there, thanks for coming! I hope this message finds you well. I want to get your attention by giving you a tasty cinnamon treat. I’m excited to share with you my newest cooking success: the tasty New Mini Cinnamon Rolls recipe. These rolls are great for any family gathering or party. The small treats in this pack are easy to carry and taste great. Each bite will make your mouth water and give you everything you want. You can be sure that following the plan correctly will make your baked goods taste great, no matter how long you’ve been baking or how new you are to it. Finally, my dear friend, let’s put on our chef hats and get the things we need before we use kitchen magic to make it happen!
Cinnamon Rolls
Ingredients
Equipment
Method
- Prepare the Dough:In a mixing bowl, combine the flour, sugar, yeast, and salt.In a separate microwave-safe bowl or saucepan, heat the milk and butter until the butter is melted. Let it cool slightly.Add the milk mixture and the egg to the dry ingredients. Mix until a soft dough forms.Turn the dough onto a floured surface and knead it for about 5-7minutes, or until it becomes smooth and elastic.
- Let the Dough Rise:Place the dough in a greased bowl, cover it with a clean kitchen towel or plastic wrap, and let it rise in a warm place for about 1 hour, or until it doubles in size.
- Prepare the Filling:In a small bowl, mix together the brown sugar and cinnamon until well combined.Once the dough has risen, punch it down and roll it out into a rectangle about 1/4 inch thick.
- Fill and Roll theDough:Spread the softened butter evenly over the rolled-out dough.Sprinkle the cinnamon sugar mixture evenly over the butter.Starting from one of the long sides, tightly roll the dough into a log.
- Cut the Rolls:Using a sharp knife or a piece of dental floss, cut the rolled dough into 9-12 equal-sized slices.
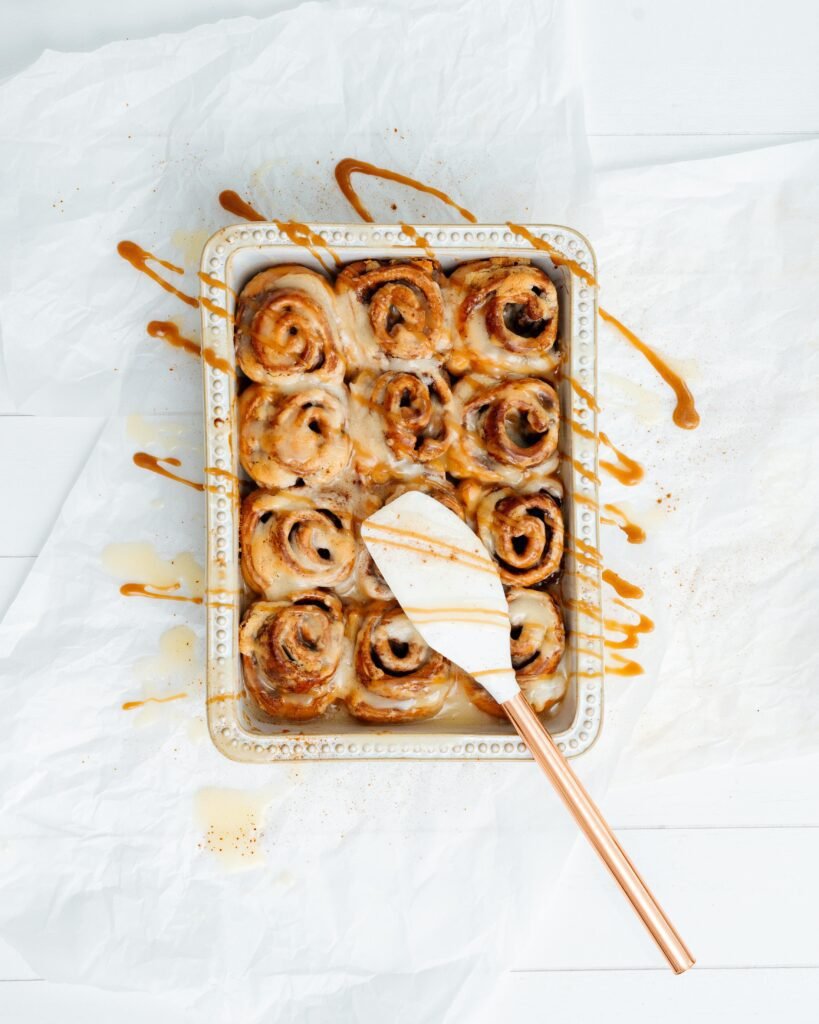
- Bake the Rolls:Place the cinnamon rolls in a greased baking dish or on a lined baking sheet, leaving some space between each roll.Cover the rolls with a clean kitchen towel or plastic wrap and let them rise again for about 30 minutes.Preheat the oven to 350°F (175°C).Once the rolls have risen, bake them in the preheated oven for15-20 minutes, or until they are golden brown and cooked through.
- Make the Icing:While the rolls are baking, prepare the icing by mixing together the powdered sugar, milk or cream, and vanilla extract until smooth.
You will also like:
- MEXICAN AVOCADO TOAST
- BREAKFAST BURRITO RECIPE POTATO
- CRAB OMELET RECIPE
- BAGELS WITH LOX AND CREAM CHEESE
- PROTEIN FRENCH TOAST RECIPE
- BACON EGG AND CHEESE RECIPE
- CRAB EGGS BENEDICT RECIPE
- HEALTHY PANCAKE RECIPE NO MILK
DETAIL METHOD TO COOK “NEW MINI CINNAMON ROLLS RECIPE”
New Mini Cinnamon Rolls Recipe: A Delicious Journey from Dough to Delight
Cinnamon rolls, those swirls of soft, sweet dough enveloped in a fragrant embrace of cinnamon and sugar, are more than just a baked treat. They’re a symbol of comfort, warmth, and the simple joys of homemade goodness. Join me on a delightful journey as we explore the ins and outs of making these delectable delights from scratch.
1. Introduction to Cinnamon Rolls
Cinnamon rolls have a rich history that dates back centuries. Originating in Sweden, these sweet treats have since captured the hearts (and taste buds) of people worldwide. From cozy breakfasts to holiday gatherings, cinnamon rolls hold a special place in many cultures and traditions.
2. Ingredients for Homemade Cinnamon Rolls
Gathering the right ingredients is essential for creating cinnamon rolls that are light, fluffy, and bursting with flavor. From pantry staples like flour and sugar to aromatic spices and rich dairy products, each component plays a crucial role in achieving the perfect balance of sweetness and spice.
3. Making the Dough
The foundation of any good cinnamon roll is its dough. Mixing, kneading, and proofing are all integral steps in the process of creating a soft and pillowy base for the swirls of cinnamon goodness to come. It’s a labor of love that requires patience and precision but yields incredibly rewarding results.
4. Proofing the Dough
During the proofing process, the yeast works its magic, causing the dough to rise and develop its characteristic airy texture. Creating the ideal environment for proofing is key, ensuring that the dough has ample time to ferment and develop flavor while avoiding any pitfalls that could hinder its rise.
5. Rolling Out the Dough
Rolling out the dough is where the real fun begins. With practiced hands and a light dusting of flour, we transform a humble ball of dough into a thin sheet ready to be adorned with layers of cinnamon and sugar. The technique requires finesse and a gentle touch to achieve the perfect thickness and uniformity.
6. Preparing the Filling
The filling is what gives cinnamon rolls their signature flavor and aroma. A simple yet irresistible combination of cinnamon, sugar, and butter creates a luscious spread that melts into the dough as it bakes, infusing each bite with sweet, spicy goodness.
7. Spreading the Filling
Ensuring an even distribution of the filling is essential for creating cinnamon rolls that are uniformly delicious. From edge to edge, we spread a generous layer of cinnamon-sugar-butter goodness, taking care to leave just enough space at the edges to prevent any leaks during baking.
8. Rolling the Dough
Rolling up the dough is perhaps the most satisfying step in the process. Starting from one end, we gently coax the dough into a tight spiral, creating a swirl of cinnamon-filled bliss with each turn. Once rolled, we seal the seam and admire our handiwork before proceeding to the next step.
9. Cutting the Rolls
Precision is key when it comes to cutting the rolls. With a sharp knife or a length of dental floss, we slice the rolled dough into individual rounds, ensuring consistency in size and shape. Each cut reveals the layers of cinnamon and sugar nestled within, promising a sweet surprise with every bite.
10. Placing the Rolls in the Pan
Arranging the rolls in the pan is like assembling a puzzle, ensuring that each piece fits snugly against its neighbors. Choosing the right pan and spacing the rolls appropriately allows for even baking and ensures that each roll emerges from the oven golden brown and perfectly baked.
11. Allowing for Final Rise
Before baking, the rolls undergo one final rise, during which they puff up and expand, filling the pan with their irresistible aroma. Covering the rolls to prevent drying and providing the optimal temperature and time for proofing are essential steps in this last stage of preparation.
12. Baking the Rolls
As the rolls bake, the kitchen fills with the tantalizing scent of cinnamon and sugar, signaling that our efforts are about to be rewarded. Keeping a watchful eye on the oven, we wait patiently until the rolls are golden brown and beautifully risen, ready to be adorned with a finishing touch.
13. Making the Glaze
No cinnamon roll is complete without a drizzle of glaze. Whether it’s a simple powdered sugar glaze or a decadent cream cheese icing, the finishing touch adds a touch of sweetness and indulgence that takes these treats to the next level.
14. Applying the Glaze
With a steady hand and a generous spirit, we apply the glaze to the warm rolls, allowing it to seep into the crevices and coat each roll in a luscious layer of sweetness. The glaze adds a glossy finish that beckons us to take a bite and savor the irresistible combination of flavors and textures.
15. Serving and Presentation
With the rolls baked, glazed, and ready to enjoy, it’s time to consider presentation. Whether served on a platter for a special occasion or enjoyed straight from the pan for a cozy breakfast at home, cinnamon rolls are best enjoyed warm and fresh from the oven, accompanied by a steaming cup of coffee or tea.
16. Storing Cinnamon Rolls
If by some miracle there are leftover cinnamon rolls (a rare occurrence in my household), proper storage is essential for preserving their freshness and flavor. Whether refrigerated or frozen, airtight packaging and reheating techniques ensure that every bite is just as delicious as the first.
17. Variations and Customizations
While classic cinnamon rolls are undeniably delicious, there’s no shortage of ways to customize this timeless treat. From adding nuts or raisins to the filling to experimenting with different spices and flavorings, the possibilities are endless, allowing for endless creativity in the kitchen.
18. Troubleshooting Common Issues
Even the most seasoned bakers encounter challenges from time to time, but fear not—help is at hand. Whether your dough is too dry or your rolls aren’t rising properly, there are solutions to common issues that can help salvage your cinnamon roll dreams and ensure delicious results every time.
19. Health Considerations
While cinnamon rolls are undeniably indulgent, it’s important to enjoy them in moderation and consider any dietary restrictions or preferences. Substituting ingredients, opting for whole grains, and mindful portion control are all ways to enjoy these sweet treats without sacrificing taste or nutrition.
20. Conclusion and Final Thoughts
Now that we’ve learned all about cinnamon rolls, I hope you have a deeper understanding of how much love and care goes into making them from scratch. There’s something warm and happy about cinnamon rolls, whether you eat them on a lazy Sunday morning or with family and friends during the holidays. Don’t be afraid to get your hands dirty and start your own cinnamon roll adventure. I promise the results will be delicious.
FAQ
- What ingredients do I need for the new mini cinnamon rolls recipe?
- You’ll need flour, sugar, butter, yeast, milk, cinnamon, salt, and optionally, icing ingredients like powdered sugar and milk.
- Can I use instant yeast instead of active dry yeast?
- Yes, you can substitute instant yeast for active dry yeast. However, you may need to adjust the rising time slightly as instant yeast tends to work faster.
- Do I have to use whole milk, or can I use a milk alternative?
- You can use any type of milk you prefer, including dairy alternatives like almond milk or soy milk. Just ensure it’s at room temperature for proper yeast activation.
- How long does it take to make these mini cinnamon rolls?
- The total time including prep, rising, and baking is approximately 2 to 2.5 hours.
- Can I make these mini cinnamon rolls ahead of time?
- Yes, you can prepare the dough and shape the rolls ahead of time, then refrigerate them overnight. In the morning, allow them to come to room temperature and rise for about 30 minutes before baking.
- How should I store leftover mini cinnamon rolls?
- Store any leftovers in an airtight container at room temperature for up to 2 days. You can also freeze them for longer storage.
- Can I make these cinnamon rolls without butter?
- Butter adds richness and flavor to the dough and filling, but you can substitute it with margarine or a plant-based spread if preferred.
- Do I have to use a stand mixer, or can I knead the dough by hand?
- You can absolutely knead the dough by hand if you don’t have a stand mixer. Just be sure to knead it until it’s smooth and elastic.
- What should the texture of the dough be like after it’s kneaded?
- The dough should be smooth, slightly tacky, and elastic. It should spring back when lightly pressed with your finger.
- Can I add nuts or raisins to the filling?
- Yes, you can customize the filling by adding chopped nuts, raisins, or even chocolate chips if desired. Sprinkle them evenly over the cinnamon-sugar mixture before rolling up the dough.